Installing a laminate countertop requires specific tools, including a circular saw, router, drill, and level. You’ll need to remove the old countertop, disconnect plumbing, and guarantee base cabinets are level. Cut the laminate precisely, apply contact cement adhesive, and position carefully using alignment dowels. Secure brackets every 16 inches, seal all edges with silicone caulk, and verify levelness. Proper installation techniques greatly impact your countertop’s durability and professional appearance.
Gathering Required Tools and Materials
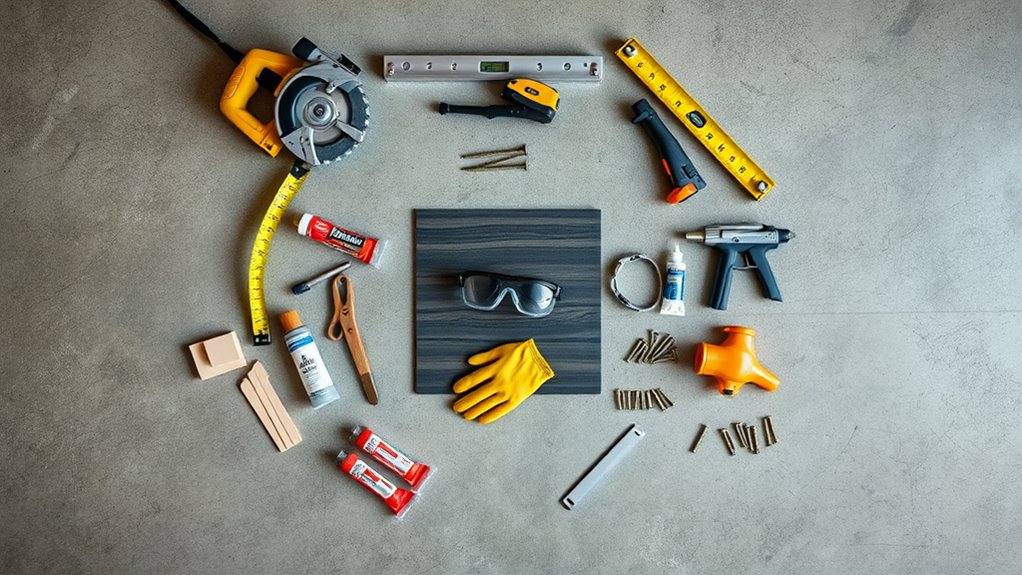
A successful laminate countertop installation requires a thorough set of tools and materials to guarantee proper execution. Your tools checklist should include a circular saw with fine-tooth blade, router with carbide bits, electric drill, level, measuring tape, and a belt sander. You’ll also need marking tools, safety equipment, and clamps for secure positioning.
For material types, gather your pre-cut laminate countertop sections, end caps, mounting brackets, and appropriate adhesives. You’ll require construction-grade contact cement, silicone caulk, and miter bolts for joining sections. An extra set of materials includes wood shims, build-up strips, and scribe molding for proper fitting. Don’t forget fasteners like wood screws and finishing nails. Having these components ready before starting guarantees efficient workflow and prevents mid-project delays that could compromise installation quality.
Taking Accurate Measurements
Three critical measurements form the foundation of any successful laminate countertop installation: the base cabinet dimensions, wall angles, and total surface area. You’ll need precision measurement tools including a laser level, steel tape measure, and angle finder to guarantee accuracy.
| Measurement Type | Required Tools |
|---|---|
| Cabinet Width | Steel Tape |
| Cabinet Depth | Laser Level |
| Wall Angles | Angle Finder |
| Surface Area | Calculator |
Map your measurements systematically, starting from the corner and working outward. Don’t forget to account for overhangs (typically 1.5 inches at the front and 0.5 inches at the sides). Double-check your angles – they’re rarely perfect 90 degrees in older homes. For L-shaped countertops, measure each leg separately and verify the corner measurements twice to guarantee proper miter joint alignment.
Removing the Old Countertop

Before starting any countertop removal, you’ll need to shut off the water supply and disconnect all plumbing fixtures, including the sink, disposal, and faucet assemblies. Using a putty knife and adhesive solvent, methodically scrape away any remaining caulk or construction adhesive that’s bonding the old countertop to the base cabinets. Once you’ve removed all fasteners and adhesive residue, lift the old countertop straight up and away from the cabinet base, being mindful of any protruding nails or staples.
Disconnect Plumbing First
When replacing your laminate countertop, proper plumbing disconnection guarantees a safe and damage-free removal process. Before starting any disconnecting procedures, you’ll need to shut off the water supply valves beneath your sink. These essential plumbing tips will help you avoid potential water damage and complications.
Follow these critical steps:
- Disconnect the faucet supply lines using an adjustable wrench, keeping a bucket nearby to catch residual water
- Remove the P-trap assembly from the sink drain, protecting the flooring with towels to absorb any trapped water
- Detach the garbage disposal unit if present by disconnecting both electrical and drain connections
Once you’ve completed these steps, inspect all connections for any remaining attachments. If you’re not confident with plumbing work, it’s advisable to consult a licensed plumber for this phase of the project.
Remove Old Adhesive Carefully
Removing stubborn adhesive residue requires methodical technique and proper tools to prevent substrate damage. You’ll need to employ specific adhesive removal techniques while maintaining the integrity of the underlying surface.
| Tool | Application | Safety Note |
|---|---|---|
| Heat Gun | Softens adhesive | Keep moving to avoid scorching |
| Putty Knife | Scrapes residue | Use 45-degree angle |
| Solvent | Dissolves bonding | Guarantee ventilation |
| Orbital Sander | Final cleanup | Wear dust mask |
Apply heat at 150°F to soften the adhesive, then immediately scrape with a wide putty knife. For stubborn areas, use a commercial adhesive remover following manufacturer’s specifications. These countertop preparation tips are essential for proper laminate installation. Once bulk material is removed, sand remaining residue with 80-grit paper, then progress to 120-grit for final smoothing. Vacuum thoroughly before proceeding to next step.
Preparing the Base Cabinets
Before installing your new laminate countertop, you’ll need to verify your base cabinets are perfectly level and securely fastened to both the wall and floor using appropriate mounting hardware. Thoroughly clean all cabinet surfaces with a degreaser to remove any residue, dust, or debris that could interfere with proper adhesion or alignment. Install continuous support rail strips along the cabinet tops, ensuring they’re flush with the cabinet face frames to provide essential structural reinforcement for your countertop installation.
Level and Secure Cabinets
The success of your laminate countertop installation depends heavily on properly leveled and secured base cabinets. Before proceeding with the countertop placement, perform thorough stability checks and verify precise cabinet alignment across your entire installation area.
Using a 4-foot level, check each cabinet’s horizontal and vertical planes. Make necessary adjustments by installing shims beneath the cabinet bases and against the wall supports. Once properly positioned, secure the units following these critical steps:
- Fasten adjacent cabinets together using #8 x 2½” wood screws through their face frames.
- Anchor cabinets to wall studs using 3-inch lag screws with washers.
- Install metal L-brackets at the cabinet base where they meet the wall.
After securing all connections, recheck levels and tighten any loose fasteners before proceeding with your countertop installation.
Clean All Cabinet Surfaces
Thoroughly clean the cabinet tops and surrounding surfaces to create an excellent substrate for laminate countertop adhesion. You’ll need to remove all debris, grease, and residual adhesive from previous installations. For best cabinet maintenance, use a degreasing agent and lint-free cloths to guarantee surfaces are pristine.
| Surface Type | Cleaning Method |
|---|---|
| Wood | TSP solution |
| Melamine | Denatured alcohol |
| Metal | Industrial degreaser |
| Particleboard | Dry brush + vacuum |
| Plywood | Mineral spirits |
Apply cleaning agents systematically, working from back to front. Don’t skip corners or edges where dust accumulates. Once cleaned, run your hand across surfaces to detect any rough spots or residue. For stubborn areas, use a plastic scraper to avoid damaging the cabinet material. These cleaning tips guarantee proper adhesion and prevent future installation issues. Allow surfaces to dry completely before proceeding.
Add Support Rail Strips
Installing support rail strips represents a vital foundation for proper countertop installation. These horizontal braces provide essential structural integrity and guarantee your countertop materials remain level and secure. You’ll need to attach 1×2 or 1×3 wood strips along the cabinet tops using appropriate installation techniques.
- Position the support strips flush with the cabinet face frames, making sure they’re level and properly aligned with adjacent cabinets
- Secure the strips using #8 wood screws at 6-inch intervals, countersinking each screw to prevent interference with the countertop
- Install supplementary support strips along the back wall and sides of corner cabinets, maintaining a consistent height of 3/4 inch below the cabinet top
Don’t skip this vital step – proper support rail installation prevents sagging and guarantees your laminate countertop maintains its integrity for years to come.
Cutting the Laminate Countertop
Precise measurements and proper cutting techniques form the foundation of a professional-looking laminate countertop installation. Use specialized laminate tools, including a circular saw with a fine-toothed blade, to achieve clean, precise cuts. Mark your cutting lines clearly and double-check all measurements before proceeding.
| Cut Type | Tool Required | Special Considerations |
|---|---|---|
| Straight Cuts | Circular Saw | Use straight edge guide |
| Sink Cutouts | Jigsaw | Cut from backside |
| Corner Joints | Router | 45-degree miter cuts |
| End Caps | Hand Saw | Score before cutting |
When cutting, position the laminate face-down to prevent chipping and splintering. You’ll need to make relief cuts around corners and sink openings to prevent stress cracks. Always wear appropriate safety gear and maintain steady, controlled movements throughout the cutting process. For complex cuts, consider creating a template initially.
Installing Support Brackets
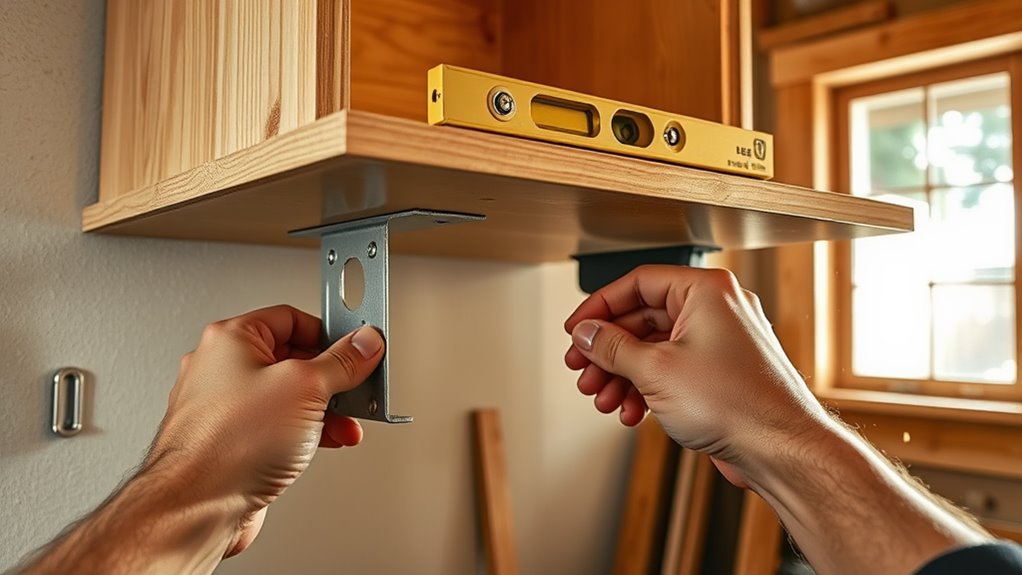
You’ll need to install support brackets every 16 inches along the wall to properly distribute the countertop’s weight and prevent sagging. Using a stud finder, secure these heavy-duty L-brackets directly into wall studs with 3-inch wood screws, ensuring each bracket can support at least 100 pounds. Level each bracket precisely using a laser level or bubble level, maintaining a uniform height of 34.5 inches from the floor for standard countertop installation.
Spacing Between Support Brackets
Proper bracket spacing forms the foundation for a stable laminate countertop installation. The correct distance between brackets guarantees ideal support weight distribution and prevents sagging or warping over time. When installing support brackets along the countertop run, you’ll need to follow industry-standard spacing requirements.
- Position brackets at 16-inch intervals for standard residential applications with 25-inch deep countertops
- Reduce spacing to 12 inches for commercial installations or areas supporting heavy appliances
- Install extra brackets within 6 inches of all seams, joints, and unsupported ends
For cantilevers extending beyond cabinet edges, don’t exceed 12 inches of overhang without further bracing. You’ll also need to secure brackets directly into wall studs using appropriate lag bolts to achieve maximum load-bearing capacity and structural integrity.
Securing Brackets to Wall
Three critical steps guarantee secure bracket mounting to your wall structure. Initially, locate and mark your wall studs using a stud finder, ensuring you’ll anchor into solid structural support. For areas between studs, you’ll need heavy-duty wall anchors rated for the countertop’s weight.
Select appropriate bracket types based on your installation – L-brackets for standard countertops or corbel-style supports for breakfast bars. Position each bracket at your pre-marked height, ensuring perfect level alignment using a laser level or standard level.
Pre-drill pilot holes through the bracket’s mounting points into studs or for wall anchors. Install wall anchors if needed, then secure brackets using appropriate lag screws or mounting bolts. Verify each bracket’s stability by applying downward pressure before proceeding with countertop installation.
Level Bracket Placement
While mounting support brackets requires precision, achieving perfect leveling is paramount for a professional installation. Select appropriate bracket types based on your countertop’s material weight and dimensional specifications. You’ll need to guarantee each bracket provides adequate structural support while maintaining proper clearance for drawers and cabinet functionality.
For ideal bracket placement, follow these critical installation tips:
- Use a laser level to mark consistent heights across all cabinet walls, maintaining a standard 1.5-inch setback from the cabinet face
- Space brackets no more than 16 inches apart, with extra support at seams and corners
- Verify level alignment with a 4-foot spirit level, adjusting bracket height as needed using shims or mounting hole variations
Double-check your measurements before final tightening, as corrections post-installation can compromise structural integrity.
Applying Adhesive and Positioning
Spread contact cement evenly across both the countertop substrate and laminate backing using a notched trowel or roller. Allow the adhesive to become tacky to the touch, typically 15-20 minutes depending on temperature and humidity conditions. This waiting period is essential for proper bonding strength.
Position alignment dowels along the substrate’s edge to guarantee precise laminate placement. Once the adhesive’s ready, carefully lower the laminate onto the substrate, starting from one end and working in the direction of the other. You’ll need to work quickly as contact cement creates an immediate bond. Use a J-roller or laminate roller to apply firm, consistent pressure from the center outward, eliminating any air pockets. Pay special attention to edges and seams where adhesive bonding is vital. Remove alignment dowels and roll those areas thoroughly.
Securing the Countertop
After ensuring proper laminate adhesion, securing the countertop to the base cabinets requires precise mounting techniques. Ideal countertop stability depends on strategic securing methods that prevent future shifting or warping. You’ll need to implement a systematic fastening approach using construction-grade screws and mounting brackets.
- Install L-brackets at 16-inch intervals along the cabinet’s front and back rails, ensuring they’re flush with the top edge
- Drive 1¼-inch screws through the mounting blocks into the countertop’s underside, maintaining consistent torque to prevent over-tightening
- Apply silicone caulk at all wall joints and seams for supplementary stability and moisture protection
Position support cleats at any unsupported spans exceeding 24 inches to prevent sagging. Check for level one final time and adjust bracket tension if needed.
Sealing Edges and Joints
Since proper sealing determines the longevity of your laminate installation, you’ll need to apply commercial-grade silicone sealant to all edges and joints. Begin edge sealing by running a continuous bead of sealant along the backsplash-to-wall intersection and where the countertop meets the cabinets. For joint sealing, apply sealant liberally in seams between countertop sections, guaranteeing complete coverage.
Use your finger or a specialized silicone tool to smooth the sealant, creating a uniform 45-degree cove at all intersections. Don’t skimp on sealant around sinks, cooktops, or other cutouts where moisture can penetrate. Allow the sealant to cure for 24 hours before exposing it to water or cleaning agents. This curing time guarantees prime adhesion and waterproofing performance of your sealed edges and joints.
Final Cleanup and Inspection
The final cleanup phase requires careful attention to detail to verify your laminate countertop installation meets professional standards. Begin your final inspection by executing an extensive cleanup checklist to guarantee a flawless finish.
- Remove all debris, adhesive residue, and dust using a soft microfiber cloth dampened with manufacturer-approved laminate cleaner. Don’t use abrasive materials that could scratch the surface.
- Inspect all seams, joints, and edges for proper adhesion, verifying there aren’t any gaps, lifting, or irregular changes. Check that all caulking is smooth and uniform.
- Test the countertop’s functionality by verifying level surfaces with a bubble level, confirming proper clearance for drawers and cabinets, and examining sink and appliance installations for secure fitting.
Document any areas requiring touch-ups before considering the installation complete.
Frequently Asked Questions
Can Laminate Countertops Be Installed Over Existing Countertops?
Yes, you can install laminate countertops over existing surfaces, but proper countertop preparation is essential. You’ll need to guarantee the existing surface is completely flat, stable, and free of damage. For ideal installation tips, sand the old surface thoroughly, fill any gaps or seams, and remove all fixtures. However, it’s recommended to remove the old countertop whenever possible, as overlaying can affect height clearances and potentially void manufacturer warranties.
How Long Should I Wait Before Using My Newly Installed Laminate Countertop?
For ideal laminate care, you’ll need to wait 24 hours after installation before using your new countertop. This allows the adhesives to fully cure and bond properly. During this initial period, don’t place heavy objects or expose the surface to excessive moisture. As part of proper countertop maintenance, you should avoid direct contact with hot items and use cutting boards even after curing. Following these guidelines guarantees your laminate countertop’s longevity and performance.
What’s the Average Lifespan of a Properly Installed Laminate Countertop?
With proper countertop maintenance, you’ll find that laminate durability typically extends 10-20 years. You can expect your laminate countertop to serve you well for approximately 15 years under normal household use. However, you’ll enhance its lifespan by avoiding direct heat, using cutting boards, promptly cleaning spills, and preventing standing water at the seams. High-quality laminates with premium substrate materials can even surpass the 20-year mark when carefully maintained.
Can I Repair Scratches or Chips in My Laminate Countertop?
You can perform scratch repair and chip repair on your laminate countertop using specialized repair products. For minor scratches, apply a color-matched laminate repair paste or marker. Deep scratches and chips require a two-part epoxy filler system designed specifically for laminate surfaces. After the repair compound cures, you’ll need to carefully sand the area and apply a clear sealant. For extensive damage, consider consulting a professional countertop specialist.
Is It Possible to Install a Laminate Countertop Without Professional Help?
Yes, you can tackle laminate countertop DIY installation if you’re comfortable with basic home improvement projects. You’ll need essential countertop tools like a circular saw, jigsaw, router, and level. It’s vital that you measure precisely, understand miter joints, and properly seal all edges. While it’s manageable for experienced DIYers, be aware that mistakes can be costly and permanent. If you’re not confident with power tools, consider professional installation.