Cutting quartz countertops requires seven critical steps for professional results. You’ll need to start with professional-grade tools, including a wet circular saw with diamond blade and proper safety equipment. Next, take precise measurements and mark your cuts carefully. Set up a well-ventilated workspace, prepare your wet saw, execute controlled cuts at 1-2 inches per minute, smooth edges with progressive grit pads, and finish with proper sealing. Master these technical aspects to achieve the flawless finish of an industry expert.
Gather Essential Tools and Safety Equipment

Before attempting any quartz countertop cuts, you’ll need professional-grade tools and proper safety equipment to secure precision and protect against silica dust exposure. Essential tool selection tips include investing in a variable-speed wet circular saw with diamond blade, measuring tools, clamps, and straight edges. You’ll also need a wet polisher with diamond pads for edge finishing.
For safety gear, equip yourself with NIOSH-approved respiratory protection, safety goggles, ear protection, and cut-resistant gloves. A water feed system is vital to minimize hazardous silica dust. Set up your workspace with proper ventilation and make sure you have access to GFCI-protected power outlets. Position heavy-duty sawhorses and secure work surfaces to create a stable cutting environment. Don’t forget to have a wet-vacuum system ready for cleanup.
Precise Measuring and Marking Your Cuts
Before marking any cuts, you’ll need a measuring tape, carpenter’s square, and fine-tip permanent marker to guarantee professional results. Take detailed measurements of your counter space at least twice, accounting for sink cutouts, edges, and seams that will affect your final dimensions. Mark your cut lines boldly and precisely on the quartz surface using straight edges as guides, creating clear indicators that you’ll follow during the cutting process.
Measuring Tools You Need
Since precision is paramount when cutting quartz countertops, you’ll need a specific set of measuring tools to achieve professional results. Start with a professional-grade measuring tape that’s at least 25 feet long and features both imperial and metric measurements. A laser level will guarantee perfectly straight lines and help you maintain accurate angles across the entire workspace.
You’ll also need a carpenter’s square for marking 90-degree angles, a combination square for versatile measurements, and a straight edge that’s at least 4 feet long. Don’t forget to include a fine-point permanent marker or carpenter’s pencil for precise markings. For complex cuts, invest in a digital angle finder to measure exact degrees and a digital caliper for precise thickness measurements.
Double-Check All Dimensions
The three most critical steps in achieving perfect quartz cuts begin with careful measurement verification. To start, measure your countertop space twice using professional-grade measurement tools, noting any irregularities in wall angles or corners. Second, transfer these measurements to your quartz slab, adding a 1/8-inch overhang where needed for proper fitting.
Lastly, mark your cutting lines clearly with a carpenter’s pencil, using a straight edge to guarantee precision. You’ll want to verify these marks against your original measurements before proceeding with any cutting techniques. Cross-check dimensions at multiple points, especially at corners and seams, as even minor discrepancies can result in costly mistakes. Keep in mind that inside corners require special attention due to their impact on structural integrity and overall fit.
Mark Clear Cut Lines
Making precise cut lines requires three specialized tools: a quality straight edge, fine-tip permanent marker, and masking tape. Apply masking tape along your measurement lines to improve cut visibility and prevent the marker from bleeding into the quartz surface. You’ll want to mark both the top and bottom edges to guarantee perfect alignment.
| Marking Step | Critical Action |
|---|---|
| Step 1 | Clean surface thoroughly |
| Step 2 | Apply masking tape strips |
| Step 3 | Draw reference lines |
| Step 4 | Double-check measurements |
| Step 5 | Mark cut depth points |
For complex cuts, use advanced marking techniques like template tracing or radius marking. When marking sink cutouts, add a 1/8-inch allowance for fine-tuning. Don’t forget to indicate waste sides with “X” marks to prevent costly cutting errors. Your marks should be bold enough to remain visible through cutting dust but thin enough for precision.
Setting Up Your Workspace for Success
You’ll need proper ventilation and adequate task lighting to maintain safety while cutting quartz, so position your work area near windows or set up dust extraction systems and bright LED work lamps. Keep your immediate workspace and surrounding area completely clear of debris, tools, and obstacles that could interfere with your cutting movements or create tripping hazards. Position your essential safety equipment – including safety glasses, respirator, ear protection, and heavy-duty gloves – within arm’s reach of your cutting station for quick access during the fabrication process.
Proper Ventilation and Lighting
Since quartz cutting generates hazardous silica dust, proper ventilation and lighting aren’t just safety considerations – they’re essential workspace requirements. You’ll need to install sturdy ventilation systems that effectively capture and remove airborne particles, while ensuring your workspace has adequate lighting options for precise cuts.
For peak safety and performance, implement these critical elements:
- Install a dedicated dust collection system with HEPA filtration
- Position exhaust fans to create cross-ventilation
- Mount high-output LED task lights directly above the cutting area
- Set up supplementary lighting at 45-degree angles to eliminate shadows
Your ventilation setup should maintain negative air pressure in the cutting zone, while your lighting configuration must eliminate glare and dark spots. Remember to regularly maintain your ventilation systems and keep light fixtures clean for consistent performance.
Clear Surrounding Work Area
A clear, organized workspace serves as the foundation for safe and precise quartz countertop cutting. Remove all tools, materials, and equipment that aren’t essential for the cutting process, maintaining a clutter-free environment within a 6-foot radius of your cutting station.
Establish dedicated zones for your cutting tools, measuring instruments, and safety equipment to guarantee smooth workflow changes. Position your quartz slab on sturdy sawhorses with ample clearance on all sides, allowing unrestricted movement during the cutting process. Sweep the floor to eliminate any debris that could cause slips or affect your stability while operating cutting equipment.
Proper workspace organization isn’t just about convenience—it’s vital for maintaining precise measurements, preventing accidents, and executing professional-quality cuts in your quartz countertop project.
Essential Safety Equipment Layout
Safety equipment placement transforms your organized workspace into a protected cutting environment. You’ll need to position your protective gear within arm’s reach while maintaining clear access to your cutting tools and quartz material. Verify your safety goggles and N95-rated dust mask are readily accessible before starting any cuts.
Establish your safety equipment zones in this sequence:
- Place safety goggles and dust mask at your primary workstation
- Position initial aid kit within 10 feet of cutting area
- Set up water supply lines for wet-cutting nearby
- Install dust extraction system with hose connections ready
Your hearing protection should remain with your safety glasses, while backup respiratory protection stays in a sealed container. Keep all electrical connections raised and away from water sources to prevent hazards during wet-cutting operations.
Preparing Your Wet Saw and Diamond Blade
Before cutting any quartz countertop, proper wet saw setup and blade inspection are critical for achieving professional results. Start by checking your diamond blade’s condition, confirming it’s specifically rated for quartz cutting and shows no signs of wear or damage. You’ll need a continuous rim blade for straight cuts and a segmented blade for intricate details.
Clean your wet saw thoroughly, removing any debris from previous cuts. Fill the water reservoir to the manufacturer’s recommended level and verify the pump’s functionality. The water flow should fully coat the blade during operation. Adjust the cutting guide to confirm it’s perfectly square and locked firmly in place. Test the saw’s alignment by making a practice cut on scrap material. If you notice any vibration or unusual sounds, address these issues before proceeding with your quartz project.
Executing the Perfect Cut Technique
While proper setup guarantees safety, mastering the cutting technique itself determines the quality of your finished edge. Professional tips suggest maintaining steady pressure and a consistent feed rate throughout the entire cut. You’ll need to let the blade do the work – don’t force it through the material.
Let the blade’s natural cutting action guide your work – forcing material through risks compromising both safety and quality.
For best cutting techniques on quartz surfaces:
- Position yourself at a 45-degree angle to the saw for better control
- Feed the material at 1-2 inches per minute
- Keep the water flowing continuously on the blade
- Maintain firm downward pressure without pushing forward
As you near the end of the cut, reduce your feed rate slightly to prevent chipping. If you’re hearing grinding or seeing burning marks, you’re moving too fast. Remember to keep both hands on the quartz slab, maintaining steady control throughout the entire cutting process.
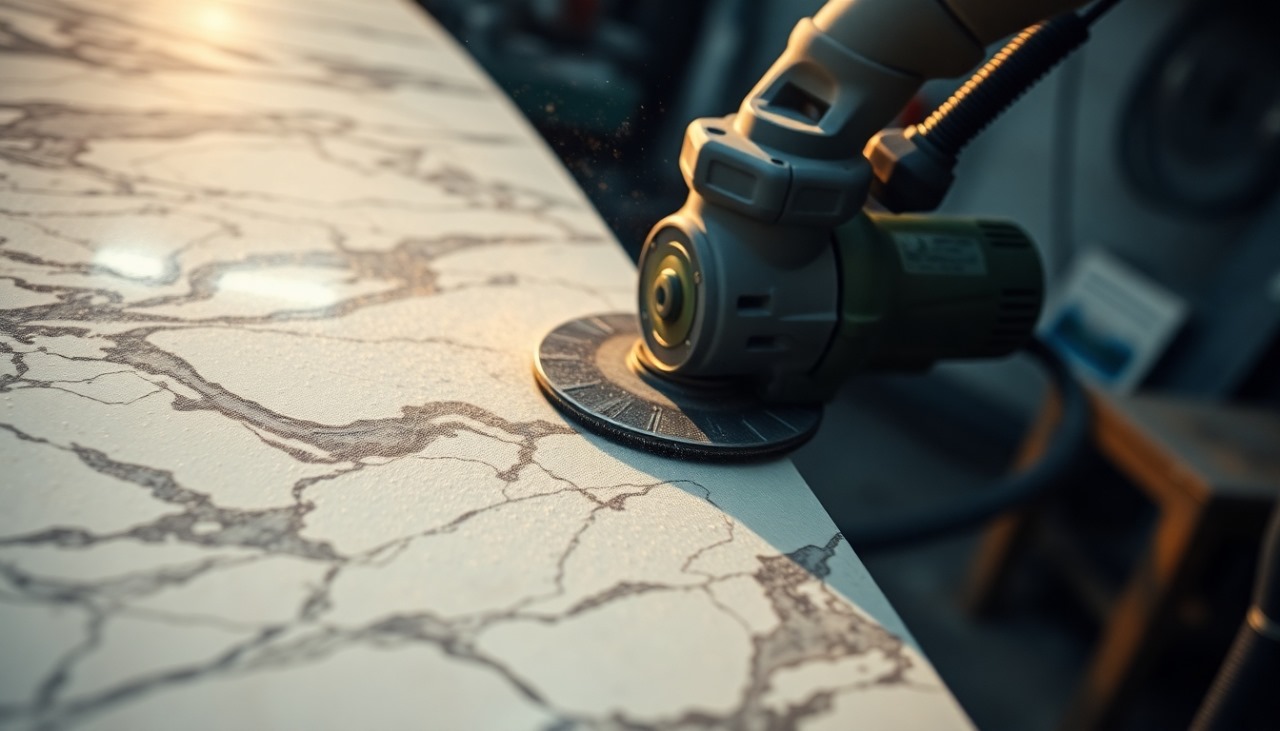
Smoothing and Polishing Cut Edges
After completing your cut, achieving a professionally finished edge requires systematic smoothing and polishing. Begin with a 50-grit diamond pad to remove any roughness, working in steady, circular motions while keeping the edge wet. Progress through increasingly finer grits: 100, 200, 400, and 800.
For ideal edge finishing, switch to a variable-speed polisher fitted with premium resin pads. Work at 2,500 RPM, maintaining consistent pressure and overlapping passes. Shift through 1,500, 2,000, and 3,000 grit pads until you achieve a glass-like surface. Apply a specialized quartz polish compound for the final pass, using polish techniques that focus on even coverage. You’ll know you’ve reached professional quality when the edge reflects light uniformly and feels completely smooth to the touch.
Installing and Sealing the Cut Quartz
Professional installation of your cut quartz requires precise placement and proper sealing techniques. Before starting the countertop installation, verify all cabinets are level and support structures are secure. Apply a high-quality silicone adhesive to secure the quartz sections, maintaining consistent 1/8-inch expansion gaps at walls.
For best sealing results, follow these critical steps:
- Clean all surfaces thoroughly with denatured alcohol
- Apply color-matched seam adhesive between quartz pieces
- Use seam clamps to maintain even pressure during curing
- Remove excess adhesive immediately with a plastic scraper
Once the adhesive cures, apply a penetrating sealer specifically designed for quartz surfaces. Work in small sections, using circular motions to verify complete coverage. Allow the sealer to cure for 24 hours before using your countertop to achieve maximum protection.
Frequently Asked Questions
Can Quartz Countertops Be Cut With a Regular Circular Saw?
You can’t safely cut quartz countertops with a regular circular saw. You’ll need a wet saw equipped with a diamond blade specifically designed for stone cutting. Proper saw blade selection is essential – only continuous rim diamond blades rated for engineered stone will work. Your cutting techniques must include water cooling to prevent dust, blade damage, and potential cracking. Using standard wood-cutting circular saws will damage both the material and the tool.
What’s the Average Cost to Hire a Professional to Cut Quartz?
You’ll typically pay between $200-500 for professional quartz cutting services, though cost factors can vary greatly based on your location and project complexity. If you’re getting multiple cuts or need specialty edges, expect to pay upwards of $700-1,000. Professional services often charge by linear foot ($50-100) or hourly ($75-150). Don’t forget that most fabricators include cutting costs in their comprehensive installation package, which averages $2,000-4,000 per project.
How Long Should I Wait Before Using the Countertop After Cutting?
After cutting quartz, you’ll need to allow proper drying time for any sealants or adhesives used. Wait at least 24 hours before placing items on the countertop. If you’ve used specific cutting techniques that required wet-cutting, guarantee the surface is completely dry before use. For epoxy-sealed edges or joints, wait 48-72 hours for full curing. Don’t rush this process – proper drying time guarantees your countertop’s longevity and structural integrity.
Will Cutting Quartz Void the Manufacturer’s Warranty?
Yes, cutting quartz yourself will typically void your manufacturer’s warranty. Most manufacturers explicitly state in their warranty terms that any modifications, including cutting, must be performed by certified fabricators. These warranty implications are serious, as you’ll lose protection against defects and potential issues. If you need modifications, it’s best to review your manufacturer guidelines and work with authorized professionals to maintain your warranty coverage and guarantee proper fabrication techniques.
Can I Cut Quartz Countertops Outdoors in Cold Weather Conditions?
You can cut quartz outdoors in cold weather, but you’ll need to take specific cold weather precautions. Keep your material temperature above 40°F (4°C) to prevent thermal shock and potential cracking. When using outdoor cutting techniques, make sure your workspace is sheltered from wind and precipitation. You’ll also want to maintain consistent water temperature for your wet saw and store your quartz slabs in a temperature-controlled environment before cutting.