To cut your countertop perfectly, start by gathering essential tools: a circular saw with diamond blade, measuring tape, and safety gear. Next, measure twice and mark your cutting line clearly with a straightedge and carpenter's square, applying masking tape to prevent chipping. Ultimately, secure the countertop firmly and cut steadily at a consistent speed while maintaining proper saw depth. Following these steps guarantees precision, but mastering advanced techniques will raise your results to professional quality.
Essential Tools and Safety Equipment

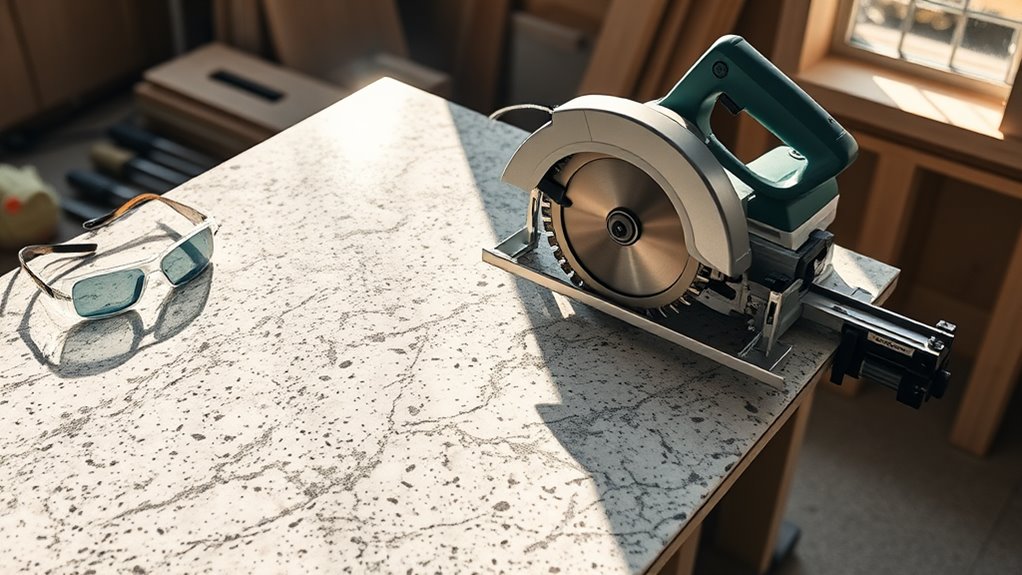
The right tools and safety equipment are essential for a successful countertop cut. You'll need a circular saw with a diamond blade, measuring tape, straight edge, pencil, and clamps to secure your workspace. Don't forget your safety goggles and cutting gloves – these aren't optional when working with power tools and sharp materials.
For precise cuts, you'll also require a level, carpenter's square, and masking tape to prevent chipping along the cut line. Keep a shop vacuum nearby to manage dust during cutting. Your workspace must be well-ventilated, and you'll want to set up sawhorses or a sturdy table at comfortable working height. When handling laminate or stone countertops, always use support blocks to prevent cracking during the cutting process.
Measuring and Marking Your Countertop
With your tools ready and workspace prepared, accurate measurements become your foundation for a perfect cut. Begin by determining your countertop dimensions using a professional-grade measuring tape. Double-check all measurements to guarantee precision before proceeding to marking.
| Marking Step | Key Action |
|---|---|
| Initial Line | Use straightedge |
| Verify Square | Check 90° angles |
| Cut Line | Mark 1/8" waste side |
| Final Check | Measure twice |
Apply proven marking techniques by positioning your straightedge firmly against the surface. Use a carpenter's square to guarantee perfect 90-degree angles at corners. Mark your cutting line with a sharp pencil, indicating which side is waste material to prevent costly mistakes. Remember to account for sink cutouts and edge treatments in your measurements. Your marks should be bold enough to remain visible throughout the cutting process.
Making the Perfect Cut
Making precise cuts requires three essential steps: securing the countertop, positioning your saw correctly, and maintaining steady control throughout the cut. Different countertop materials demand specific cutting techniques, so you'll need to adjust your approach accordingly.
Precise cuts depend on proper securing, correct saw positioning, and consistent control, adapting techniques based on your countertop material.
- Clamp your countertop firmly to a sturdy work surface, ensuring there's no movement or vibration that could affect the cut
- Set your circular saw's cutting depth to extend just 1/4 inch below the countertop's thickness to minimize splintering
- Apply masking tape along the cutting line to prevent chipping, especially with laminate materials
- Push the saw steadily forward at a consistent speed – don't force or rush the cut
Remember to wear safety gear and keep your cutting line visible throughout the process. For curved cuts, you'll need a jigsaw instead of a circular saw.
Frequently Asked Questions
How Long Should I Wait Before Using My Newly Cut Countertop?
You'll need to respect the drying time and curing process before using your newly cut countertop. Wait at least 24 hours after installation to allow adhesives and sealants to dry completely. For epoxy-based materials, extend this to 48-72 hours. You can lightly touch the surface after 24 hours, but don't place heavy objects or expose it to water for at least 72 hours to guarantee proper curing and maximum durability.
Can I Cut a Countertop That's Already Installed in My Kitchen?
Yes, you can cut an installed countertop, but it's more challenging and risky than pre-installation cutting. Different countertop materials require specific tools and techniques – laminate needs a fine-toothed blade, while stone requires a diamond blade. Installation considerations include protecting surrounding cabinets, managing dust, and ensuring proper support during cutting. If you're not confident with these technical requirements, it's best to hire a professional to avoid costly mistakes.
What Should I Do if My Cut Edges Are Slightly Uneven?
If you've got uneven cut edges, don't worry – you can fix them with proper sanding techniques. Start with a coarse-grit sandpaper (60-80) to level major inconsistencies, then progress to medium (120-150) and fine grits (220+) for smoothness. For edge finishing, use a sanding block to maintain a uniform angle, and work in straight, controlled motions. You'll want to finish with a polishing compound to match the countertop's original sheen.
Will Cutting My Countertop Void the Manufacturer's Warranty?
Yes, cutting your countertop will typically void the manufacturer's warranty coverage. Most manufacturers explicitly state in their guidelines that any DIY modifications, including cutting, will nullify your warranty protection. If you're concerned about maintaining your warranty, you'll need to have modifications performed by an authorized installer. Before making any cuts, you should review your specific warranty documentation or contact the manufacturer directly to understand the full implications.
How Do I Prevent My Countertop Material From Chipping During Storage?
To protect your countertop during storage, you'll need proper material protection strategies. Always store your countertop on a flat surface in a vertical position, supported by sturdy A-frames. Use foam padding or moving blankets between surfaces, and avoid stacking materials directly on top. Secure the edges with cardboard corner protectors, and keep the storage area climate-controlled to prevent warping. Don't forget to cover the entire piece with protective wrap to guard against dust and debris.