For bar seating, you’ll need 12-15 inches of countertop overhang for counter-height stools (24-26 inches), 15-18 inches for standard bar-height stools (28-30 inches), and 18-20 inches for extra-tall stools (33-36 inches). Your specific overhang should maintain 9-13 inches of clearance between the seat and counter bottom for comfort. Support brackets become necessary for overhangs exceeding 12 inches, with spacing every 24-30 inches. Understanding supplementary factors like material choice and support requirements guarantees your bar setup’s long-term stability.
Standard Overhang Measurements for Different Counter Heights

Three standard counter heights require specific overhang measurements to confirm comfortable seating and proper knee clearance.
For a standard 36-inch counter height, you’ll need a 12-inch overhang length to accommodate standard dining chairs. When installing a 42-inch counter height surface, plan for a 15-inch overhang to provide adequate space for counter-height stools. For bar-height counters at 48 inches, you’ll want a 15-inch overhang length to guarantee proper clearance for bar stools.
Always measure from the edge of your support base to the counter’s outer edge when calculating overhang length. If you’re planning to add supports or corbels, factor in their placement to maintain these minimum measurements. Keep in mind that these dimensions represent industry standards, but you can adjust them slightly based on your specific seating choices.
Factors That Determine Ideal Overhang Length
When you’re planning your counter overhang for bar seating, you’ll need to take into account the specific seating style (backless stools vs. backed chairs) and height requirements for ideal knee clearance. Your available floor space will directly influence the practical overhang length, as you’ll need adequate room for both seating and traffic flow. The weight of your countertop material combined with the length of the overhang will determine what support mechanisms you’ll need, from corbels to steel brackets.
Seating Style and Height
The style and height of your bar seating directly influence the required countertop overhang length needed for perfect comfort. You’ll need to take into account your seating preferences and desired comfort levels when determining the best overhang dimensions.
- Counter-height stools (24-26 inches) typically require 12-15 inches of overhang to accommodate comfortable knee clearance and proper posture
- Bar-height seating (28-30 inches) generally needs 15-18 inches of overhang to guarantee adequate legroom and prevent bumping against the counter’s edge
- Spectator-height chairs (34-36 inches) demand 18-20 inches of overhang to maintain ergonomic spacing and prevent crowding
Remember that the seating style you choose – whether backless stools, chairs with arms, or swivel seats – will affect how much space users need to sit comfortably and move freely at your counter.
Available Floor Space
Available floor space serves as a critical factor in determining your ideal countertop overhang length. You’ll need to verify there’s enough room for both comfortable seating and safe circulation behind seated guests. Industry standards recommend a minimum of 32 inches of clearance between the counter’s edge and any walls or obstacles.
When considering available floor space considerations, measure the total area and subtract the necessary walkways and traffic patterns. If you’re working with limited space, you might need to reduce the overhang length slightly while still maintaining functionality. Focus on maximizing usable space by carefully positioning the counter in relation to walls, appliances, and other fixtures. Keep in mind that insufficient clearance can create bottlenecks and compromise both comfort and safety in your kitchen or dining area.
Weight Support Requirements
Understanding weight support requirements remains essential for determining a safe and stable countertop overhang length. The weight distribution of your countertop material, combined with the intended use, will dictate the necessary support system. For overhangs exceeding 12 inches, you’ll need to install support brackets to prevent sagging and potential breakage.
Key weight support considerations include:
- Material weight – granite and marble require more support than lighter materials like laminate
- Daily load capacity – factor in the weight of items you’ll place on the overhang, including plates, drinks, and elbows
- Support bracket spacing – install brackets every 24-30 inches for ideal weight distribution
The general rule is that unsupported overhangs shouldn’t exceed 1/3 of the total countertop depth. When in doubt, it’s better to add extra support to guarantee long-term stability and safety.
Bar Stool Sizes and Their Impact on Overhang Requirements
Bar stool heights typically come in three standard measurements: counter height (24-26 inches), bar height (28-30 inches), and extra-tall bar height (33-36 inches). You’ll need to match your overhang depth to accommodate these heights, with counter stools requiring 12-15 inches, bar stools needing 15-18 inches, and extra-tall stools demanding 18-20 inches of overhang. The deeper overhang requirements for taller stools guarantee proper knee clearance and comfortable seating distance from the counter edge while maintaining ergonomic dining posture.
Standard Bar Stool Heights
The proper selection of bar stool height directly determines how much countertop overhang you’ll need for comfortable seating. When choosing bar stool styles, you’ll encounter three standard heights that correspond to different counter dimensions:
- Counter-height stools (24-26 inches) – Perfect for 36-inch countertops, these provide casual seating comfort for kitchen islands.
- Bar-height stools (28-30 inches) – Ideal for 40-42 inch surfaces, commonly used in home bars and entertainment areas.
- Extra-tall stools (33-36 inches) – Designed for 46-48 inch counters, typically found in commercial settings.
You’ll want to guarantee a 9-13 inch clearance between the seat and counter surface for maximum knee space. This height relationship guarantees proper ergonomics and prevents uncomfortable hunching or stretching while seated at your counter.
Bar Seating Depth Guidelines
When planning counter seating areas, you’ll need to evaluate both stool dimensions and body space requirements to determine proper overhang depth. Standard bar seating dimensions recommend 18-24 inches of knee space beneath the counter, while the total depth from counter edge to seated torso typically requires 24-30 inches for ideal comfort.
For proper countertop stability, you’ll want to maintain a minimum 8-inch overhang with support brackets, though 12 inches is preferable for most installations. If you’re planning an overhang greater than 12 inches, install supplementary support every 24-30 inches to prevent sagging. The width per seated person should be at least 24 inches, though 30 inches provides more comfortable spacing between bar stools and better accommodation for larger individuals.
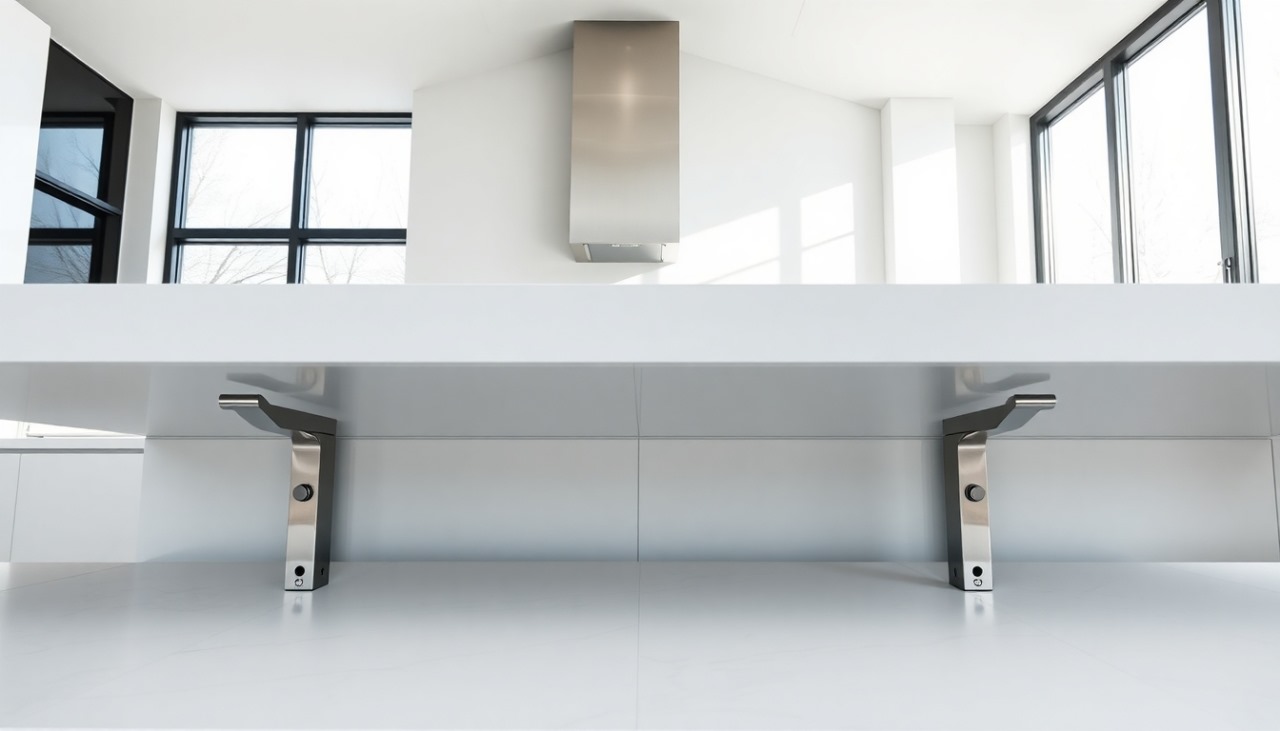
Supporting Your Countertop Overhang Safely
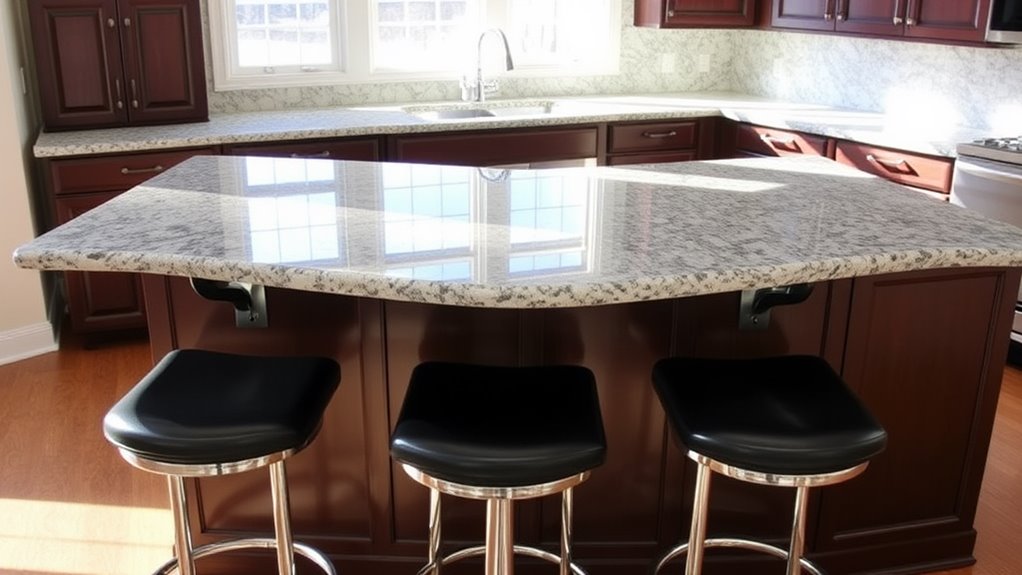
Properly supporting your countertop overhang is essential for both safety and functionality. For overhangs extending beyond 12 inches, you’ll need supplementary overhang support to meet safety standards and prevent sagging or potential breakage. The type of material you’re using also impacts the support requirements.
- Granite and marble countertops require support brackets every 24-30 inches for overhangs exceeding 12 inches
- Quartz and solid surface materials need support every 18-24 inches for overhangs over 12 inches
- Laminate countertops require support brackets every 16-20 inches for overhangs beyond 8 inches
Installing corbels, brackets, or steel support frames can provide the necessary reinforcement. For maximum stability, verify your supports are anchored into wall studs or secure cabinet frames, not just the drywall or cabinet sides.
Common Mistakes to Avoid When Planning Bar Seating
Planning bar seating around your countertop overhang requires careful thought to avoid common design pitfalls that can impact comfort and functionality. Let’s examine the key mistakes to avoid for ideal bar seating design.
| Mistake | Impact | Solution |
|---|---|---|
| Insufficient overhang | Knees hit cabinet | Extend to 12-15 inches |
| Wrong seating height | Poor ergonomics | Match counter height |
| Tight spacing | Cramped seating | Allow 24-30″ per person |
| Poor leg clearance | Uncomfortable guests | Guarantee 15″ knee space |
| Weak support | Safety hazard | Install proper brackets |
Don’t compromise countertop aesthetics by rushing your design decisions. You’ll want to take into account traffic flow, maintain proper spacing between stools, and guarantee adequate leg room. Keep in mind that proper planning prevents costly modifications later and creates an inviting space that’s both functional and comfortable.
Material Considerations for Extended Overhangs
Selecting the right material for your extended countertop overhang directly impacts its stability and longevity. When choosing materials for overhangs exceeding 12 inches, you’ll need to take into account both stone durability and structural support requirements. Natural stones like granite offer excellent strength, while engineered quartz provides consistent durability throughout the surface.
- Dense materials like granite and quartz can typically extend 1/3 of their total depth without further support
- Wood materials require special attention due to wood expansion and contraction with humidity changes
- Materials like marble or onyx need extra reinforcement due to their softer composition
For overhangs beyond standard measurements, you’ll want to incorporate corbels, brackets, or steel supports regardless of material choice. These reinforcements guarantee your countertop remains stable and safe for daily use.
Building Codes and Safety Guidelines
Before installing a countertop overhang for bar seating, you’ll need to comply with local building codes and safety standards that govern residential kitchen installations. Most jurisdictions require a minimum clearance of 36 inches between the countertop and any opposing walls or obstacles to guarantee safe movement around the seating area.
Your local building codes may also specify requirements for support brackets, particularly for overhangs exceeding 12 inches. You’ll need to verify load-bearing capacities and structural support specifications with your municipality’s building department. Safety guidelines typically mandate that countertop edges be rounded or beveled to prevent injury, and that electrical outlets be properly positioned away from potential water sources. If you’re planning to install under-counter lighting, confirm it meets local electrical codes and UL safety standards.
Measuring and Layout Tips for Perfect Placement
Accurate measurements and precise layout planning form the foundation of a successful countertop overhang installation. When implementing layout strategies, you’ll need to take into account both the finished dimensions and the space requirements for comfortable seating. Start by marking your measurement points using reliable measurement techniques and a laser level for accuracy.
- Measure from the base cabinet’s front edge, marking your desired overhang length (typically 12-15 inches for comfort)
- Draw perpendicular lines from your wall to guarantee your overhang runs perfectly parallel
- Use a cardboard template to test the space and visualize the final placement before making permanent marks
Double-check all measurements before cutting or installing support brackets. Remember to account for any wall irregularities or obstacles that might affect your layout, and always verify your measurements against your original design specifications.
Cost Implications of Different Overhang Solutions
When planning your countertop overhang, you’ll need to weigh the costs of diverse support solutions against your budget and design preferences. Basic corbels typically range from $20-50 each, making them the most economical choice for supporting overhangs up to 12 inches. Steel brackets offer increased durability at $75-150 per unit, while hidden support systems can cost $200-400 per installation.
For extended overhangs beyond 15 inches, you’ll face higher material costs due to extra structural requirements. A cost comparison shows that steel plate supports integrated during installation add $300-500 to your project, while decorative brackets can impact your budget by $150-300 each. Consider these budget constraints alongside your aesthetic goals, as more elaborate support systems can greatly affect your total investment.
Frequently Asked Questions
Can I Install a Dishwasher Under a Counter With Extended Overhang?
Yes, you can install a dishwasher under a counter with extended overhang, but you’ll need to guarantee proper planning in your countertop design. The standard dishwasher installation requires a 24-inch depth clearance, which typically works well with most overhangs. However, you’ll want to verify that the overhang’s support brackets or corbels don’t interfere with the dishwasher’s placement. Always consult your appliance specifications before finalizing your kitchen layout.
How Often Should I Reseal the Underside of My Countertop Overhang?
You’ll want to reseal the underside of your countertop overhang every 1-2 years to maintain proper moisture protection. However, if you notice any signs of water damage, discoloration, or peeling, don’t wait – reseal immediately. The sealing frequency may need to increase in high-humidity environments or if your countertop is exposed to frequent spills. Use a high-quality penetrating sealer designed for your specific countertop material to guarantee maximum protection.
Do Lighting Fixtures Under the Overhang Affect the Required Support System?
Yes, lighting fixtures under your overhang can impact support requirements. You’ll need to evaluate both the weight of the fixtures and their placement when designing your support system. If you’re installing recessed lights, you’ll have to account for extra cutouts that might weaken the structure. It’s best to position your corbels or brackets between lighting fixtures while maintaining proper spacing for ideal support. Always consult your countertop manufacturer’s specifications for specific guidance.
Can I Add an Overhang to My Existing Countertop Without Replacing It?
Incorporating an overhang to your existing countertop is possible through careful countertop modifications. You’ll need to assess your current countertop’s material and structural integrity initially. For solid surfaces, you can attach extra overhang materials using specialized adhesives and brackets. However, if you’ve got natural stone or quartz, you’ll likely need professional help to guarantee seamless integration. Keep in mind that any modification should include proper support systems to prevent sagging or breakage.
What’s the Best Way to Clean Hard-To-Reach Areas Under Counter Overhangs?
You’ll need specialized cleaning tools to effectively maintain those tricky spaces under counter overhangs. Use a flexible duster with an extendable handle to reach deep corners, or try a microfiber cloth wrapped around a yardstick. For stubborn spots, spray your cleaning solution on a slim sponge mop designed for tight spaces. Don’t forget to regularly wipe these areas to prevent dust and debris buildup – it’s easier to maintain than to deep clean.